
AOC’s all-in-one PC is the first device designed to run Jide’s Remix OS out of the box. If you love Android, you’re probably itching to get your hands on the devices, but that will probably set you back a couple of hundred dollars. Though the device will start selling in summer and the price has not yet been confirmed.
The good news is, you can make your own Remix OS PC right now and cheaply, but first ensure you got the following:
*USB 3.0 Stick with 8GB+ storage
*A Windows PC
*Your PC’s BIOS must have legacy boot mode enabled
*Remix OS USB Installer
*Remix OS
*Torrent Downloading Client
Step 1: Download Remix USB Installer and Remix OS
You will need a Torrent Downloading Client like uTorrent, which you can get here. Install uTorrent on your computer, and then proceed to download the Remix USB Installer (for installing the Remix OS on your USB stick) and the Remix OS itself. Both of which can be downloaded here.
Step 2: Format the USB 3.0 Stick using FAT32 Formatting
Assuming there are no files you need stored on the USB stick, format it using FAT32 formatting. The USB must be capable of write speeds of up to 20MB/s.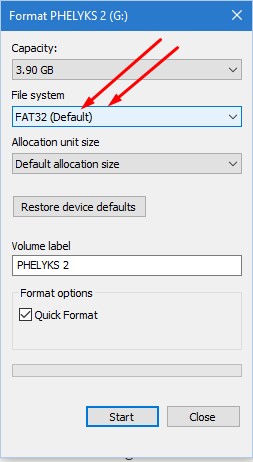
Pro Tip: You don’t have to use USB 3.0 if not readily available. Any USB stick with fast writing speed will suffice. You can even use an external hard drive if you are willing to format it.
Step 3: Run the Remix USB Installer
At this point, you already downloaded the Remix USB Installer and Remix OS 2.O in step 1 above. By running the Remix USB Installer, you will flash the Remix OS into the USB stick, making USB Bootloader.
Run the Installer as an Administrator, and chose the ISO file then select the USB drive where you want the OS to install. Select the ISO file as shown by the Installer and load it to the FAT 32 formatted USB drive, then click on Ok. The installation process will start by extracting and copying files to the USB drive. When it is finished, the USB Drive will be bootable.
Step 4: Reboot your PC
Assuming you already know the shortcut for Boot Menu for your particular PC make. That is the key combinations you have to press during booting so that the PC gives you various options from where to boot the system from.
Reboot your PC now. When the PC boots, press the key combinations that bring up the Boot Menu and list containing booting options will pop up. At this point, you mouse will not work so choose the device to boot from using the up and down arrow keys on your keyboard. Select the USB drive on which you installed the Remix OS.
Step 5: Select either Guest Mode or Resident Mode
Once the computer boots from the USB drive, you will see a blue screen asking you to choose between Guest Mode and Resident Mode.
If you choose Guest Mode, the Remix OS will load faster, but there will be no data saving on the session. While Resident Mode loads comparatively slower but all your data and apps will be saved.
Step 6: Install Remix OS
Next screen will ask you to select your preferred language. Then you will be taken to another screen where you will have to agree to the user agreement, the lastly click the Start button and voila! You are running Remix OS on your computer.
At this point, you will get features you are familiar with from when using Windows (taskbar, Start Menu, and Right side screen notifications). You can install apps from the Google Play store like you do on any Android device, but you also get to run multiple windows at the same time. Talk about multitasking on an Android platform.