
Install Java Ubuntu: How To Install JRE in Ubuntu 14.04
It is highly recommended to install Java in Ubuntu along with other software, after installing your OS so that you can use it for running various Java applications. Many people don’t like Java platform, but you will have to install JRE in Ubuntu sooner or later for supporting various Linux-based applications. This article shows a convenient method for installing Java in Ubuntu 14.04.
How to Install JRE in Ubuntu 14.04
Check Previous Installation of Java in Ubuntu 14.04
Use the following command after opening a terminal.
“Java –version”
If you don’t have Java installed on your system, you will see the following message.
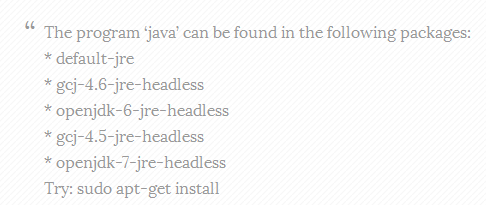
Install Java in Ubuntu 14.04
You will have to decide which version of Java you are going to install. When you have made up your mind, launch the terminal and use the following command to install JRE.
“sudo apt-get install default-jre”
Install OpenJDK in Ubuntu
Again open the terminal and install OpenJDK Java Development Kit.
“sudo apt-get install default-jdk”
If you are specifically looking forward to install Java 6 or Java 7 then you need to use “openjdk-7-jdk/openjdk-6-jdk”. However, you must install “openjdk-7-jre/openjdk-6-jdk” before it.
Install Oracle JDK in Ubuntu 14.04
You need to use the following commands for installing the Oracle JDK in Ubuntu. These commands will download plenty of files. You must have fast and reliable internet connection to download these files quickly.
“sudo add-apt-repository ppa:webupd8team/java
sudo apt-get update
sudo apt-get install oracle-java8-installer
sudo apt-get install oracle-java8-set-default”
If you desire to install Java 7 (Java 1.7), simply replace java8 with java7 in the aforementioned command.
Managing Multiple Java Versions
When you have installed multiple Java versions on Ubuntu 14.04, you can easily manage them by using some commands. Use the following command in terminal to display the available Java versions on your Linux OS.
“sudo update-alternatives –config java”
The output will be something like this if you have two versions of Java installed on your system.
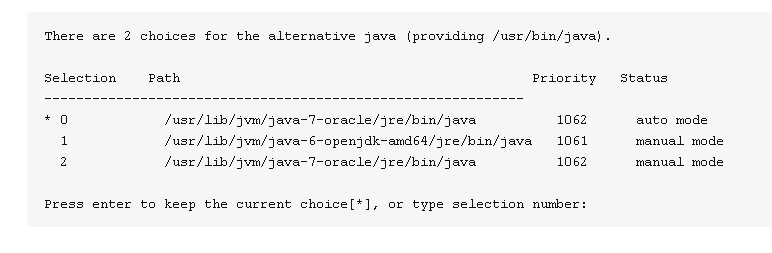
You can easily choose the number as the default version of Java. This can also be performed for the Java compiler (javac).
“sudo update-alternatives –config javac”
This article highlighted the convenient method to install Java in Ubuntu. This will open up the whole world of applications and programs that require Java for their execution. You may explore some more commands for installing and managing Java for your Linux applications.