Go SMS is one of the most popular third party messaging apps used on Android devices. Billions of MMS messages are sent daily on messaging apps. But recently, many users have complained that Go SMS Pro is not sending MMS messages when the connection is shifted from Wifi to 4g LTE network. This is a very common problem. MMS messages are not sent on a mobile internet connection. Many people aren’t able to send MMS on Wifi even but we will discuss that problem in another article. You can fix Go SMS Pro not sending MMS messages on 4G LTE using the methods described in this article. Let’s get started.
Go SMS Pro MMS Messages Not Working
From CDMA
Launch Settings in your Android phone and then go to Mobile Networks. Now click on the Network Mode and select cdma. Your phone will be rebooted automatically or you can make it reboot manually after changing these settings. That’s it. You will be able send MMS messages on Go SMS Pro.
Changing Size Limit
Open Go SMS app and go to its Settings. Now move over to “General” section and then go to “MMS Size Limit”.
This size should be 1M. Many people change it to 5M or 10M thinking that they would be able to use MMS messages with increased size, but that affects the default settings and the overall message sending is malfunctioned. Changing the size limit to 1M has solved the problem for many users.
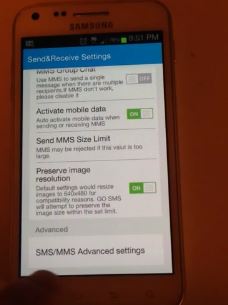
Launch Settings in Go SMS app.
Scroll down and tap on “SendandReceive”. Now scroll down and hit the SMS/MMS Advanced Settings as shown in the image.
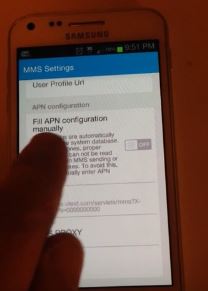
Now move down the screen and tap on “Fill APN configuration manually”. There will be a toggle button in front of it. Turn that button to ON.
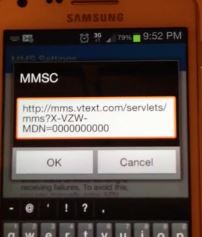
Tap on MMSC and type the following text in the text box. Type the text similar to the text shown in the image below to avoid any irregularities. After typing the text tap on “OK”.
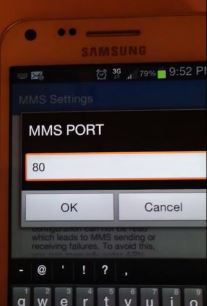
Now tap on MMS port. It should be set to 80.
Reinstall App
Many users were able to fix Go SMS Pro MMS not working on 4G LTE by uninstalling the app and reinstalling it. If none of the solutions explained above work for you, you should try this solution.
In case your problem is still unresolved, comment on this post with the model of your device and more problem details and we will get back to you with a different solution.