The majority of us use Windows, and that can be said for computer users all over the world. But we hate to love it sometimes given it can be slow during booting. Your typical PC (by that I mean a mid-range computer) takes more or less about 10 seconds after booting up for things (other applications) to start running smoothly. These first 10 seconds is needed for startup programs to ‘settle in’ and give space to the computer resources to run the applications you really need.
If you are too impatient and find these 10 seconds too much, you can disable the startup programs and have the computer at your beck and call immediately the bootup process is complete.
FYI: The startup programs that take up the first 10 seconds or so are mainly the desktop and Windows services finish loading.
If you would like to get right down to certain application as soon as your computer boots up. Then there is a workaround to disabling the Windows startup programs that follow soon after the bootup. To better realize this trick, your computer needs to be running on a Solid State Drive (SSD). Though you could try the trick on a computer running the conventional spinning hard drive (HD), the improvement will be dismal.
Caution: You’ll be Editing the Registry
This workaround entails you tinkering with the Windows Registry, and if you know anything about that, then you should know it is a very delicate procedure. Any wrong editing of the Registry could render your system unstable or completely inoperable. Now with that warning out of our way, let us proceed to edit the Registry, shall we?
First thing first, back up your computer. Like we said before, Registry Editor is a pretty powerful tool on your computer, and a tiny mistake could damage a lot on your system. Though you should be just fine if you follow the instructions below to the letter.
Disclaimer: Readers trying this workaround will be doing so at their own risk, though we take due diligence in the DIY tips we share here at innov8tiv
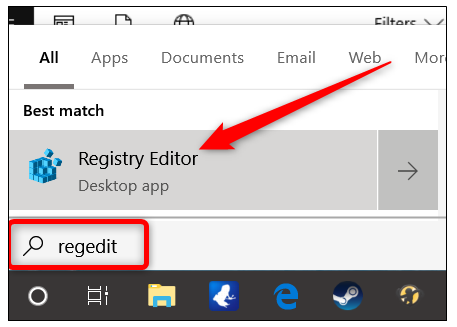
Hit Start and type regedit and hit the Enter key on the keyboard to open the Registry Editor. Give it permission to make changes on your computer.
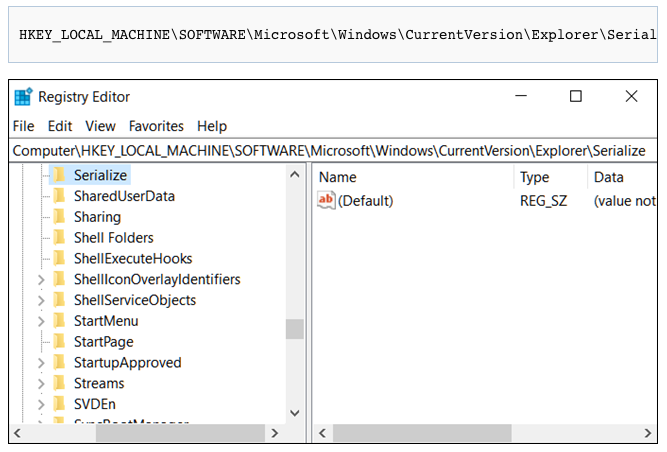
Once the Registry Editor window opens up, on the left sidebar, navigate to the following key (or you can simply copy then paste it into the address bar of the Registry Editor).
HKEY_LOCAL_MACHINE\SOFTWARE\Microsoft\Windows\CurrentVersion\Explorer\Serial
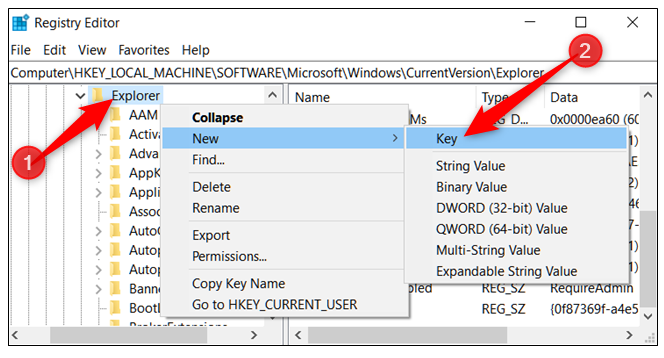
You may find that the Serialize key does not already exist on your computer. If so you will need to create it, and to do so, you need to right-click on the parent key (Explorer) and then select New > Key. Then name it Serialize.
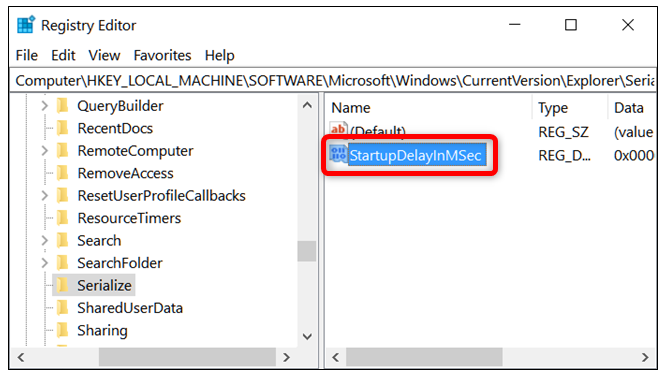
Next, right click on the Serialize key and then select New > DWORD (32-bit). You now need to name the new value as StartupDelayInMSec.
Now modify the value above by double-clicking the new StartupDelayInMSec value and set the value to 0 in the Value data box.
Click on Ok and then exit the Registry Editor. The changes made will take effect after you have restarted the PC. On the next login, you and any other user on that computer should not experience any delays Windows forces upon you after boot up.
How to re-enable Windows 10 Startup Programs
There might come a time when you wish to re-enable the startup program, perhaps you need one or a couple of the programs, you can head back to the Registry Editor. Then delete StartupDelayInMSec value by right-clicking it and selecting Delete.