Encrypt DNS Traffic: How To Encrypt Your DNS Traffic in Ubuntu
Encrypted DNS is the only thing which can mask your internet traffic. Yes! Not even VPN can promise security because each and every internet traffic call and packet goes through the DNS (Domain Name System) provided by your ISP. That means the people who are sitting at your DNS server can monitor each and every request coming from your end. How to encrypt DNS traffic is the question in which we head into. We are here to answer. You can Encrypt DNS traffic in Ubuntu by getting the simple software.
DNSCrpyt is an open source project by OpenDNS which encrypted all your DNS traffic in SSL wrapper. SSL wrapper is the best way to conceal any packet in the public networks. You can simply encrypt all your DNS Traffic by installing this DNSCrpyt tool in Ubuntu. For doing that, open the terminal and type the following commands.
sudo add-apt-repository ppa:shnatsel/dnscrypt
sudo apt-get update
sudo apt-get install dnscrypt-proxy
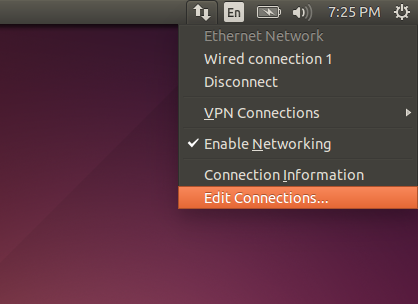
When the installation of DNSCrypt is complete, open the network manager by clicking on the “Network icon” and then select the “Edit connections” option from the context menu.
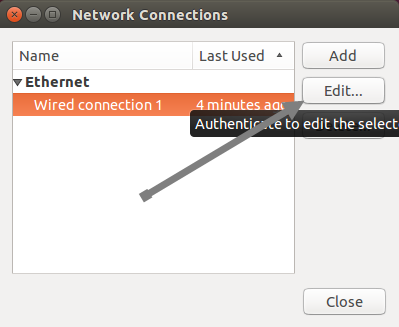
Now you should see the “Network connections” window. Select your network connection, click the “Edit” button to open an additional options window.
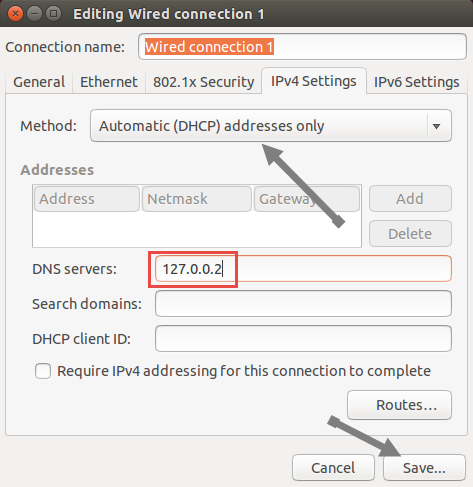
Now, click the “IPv4 settings” tab. If this method is “Automatic DHCP,” change it to “Automatic DHCP addresses only” from the drop down in front of you and enter the DNS IP address 127.0.0.2. Hit the “Save” button. Note that if the method is manual, you do not need to change it. Just enter only one DNS address as shown in the image and hit Save button.
Now you should restart your network connection or you can restart your Ubuntu machine. When you will get back, all your DNS traffic will be encrypted using DNSCrypt protocol. Congratulations! You are now masked on the internet. Encrypted DNS traffic surely brings a lot of safety and security from breaches and hacks.


Comments are closed.