Recently, we showed you how to download and install iOS 9 in your iPhone and iPad, but caveated at the same time that you may find a lot of lags, glitches and problems and iOS 9 is still in public beta version. You can downgrade iOS 9 to iOS 8.4 easily if you have tested iOS 9 and just want to go back where you were. Here are the steps you should follow to downgrade iOS 9 to iOS 8.4.
Downgrade iOS 9 to iOS 8.4
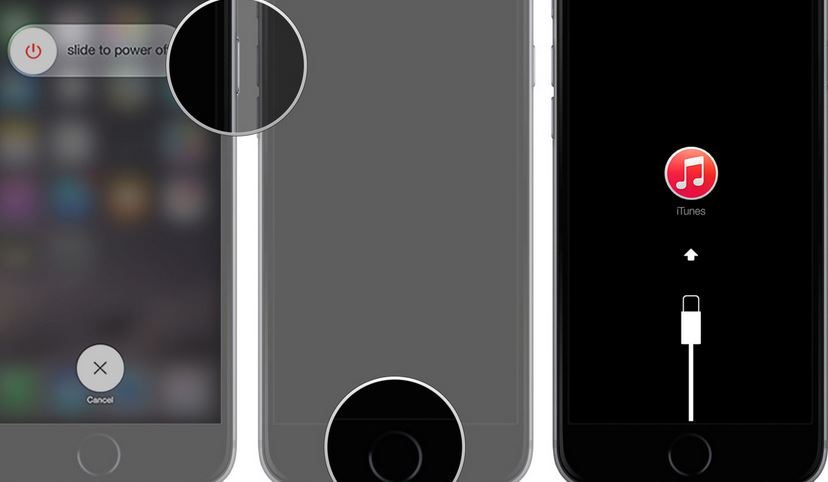
First, you will have to enable the recovery mode in your iPhone. In order to do so, press and hold Sleep/Wake button and slide to power off.
Now put one end of your iPhone or iPad data cable in the computer in which iTunes is installed.
Press and hold the Home button of your device, and connect the other end of the data cable with your iPhone or iPad. Keep holding until you see connect to iTunes option with red iTunes icon on your iPhone.
If you are unable to take your iPhone or iPad into the recovery mode, you can then try enabling DFU mode in your iPhone. Check our guide about enabling DFU mode in iPhone.
Your computer will now detect your device and iTunes will ask you to choose what to do with the device. If it doesn’t detect automatically, you can launch iTunes manually.
A dialog box will be popped up, asking you to choose what to do. Just click “Restore”.
Now click “Restore and Update”.
Click Next on the iOS 8.4 Software Updater.
Now click “Agree” to start with the downloading of iOS 8.4. The file is of heavy size (1.84 gb), and a little while will be taken depending upon the speed of your internet connection.
That’s it. If everything went well, your device will reboot to iOS 8.4. If it reboots to iOS 9, that means the process to downgrade iOS 9 to iOS 8.4 didn’t go as it should have. You must repeat all the above steps and put your phone back to recovery mode or DFU mode.
After downgrading iOS 9 back to iOS 8.4, you could restore the backup of your iPhone from iCloud or iTunes. Just connect your device to iTunes and select “Restore from this Backup”-> archived backup.
In case of any query or problem or hiccup during the process, feel free to share it in the comments and we will solve it.
Images: iMore, Engadget


